Image Editor Tips - Layers and Blending Modes
Layers
A composition can consist of several layers which are painted on top of each other. This makes it easy to move objects around and allows the creating of many special effects. Layers are shown in the Layers list at the right of the editor window. At any one time, one layer is selected in this list. All painting and filtering operates on the selected layer.
The Layers Palette
Opacity
To change the opacity of a layer, select it and choose an opacity using the slider below the layers list.
Removing and Reordering Layers
To remove the opacity of a layer, select it and select "Remove Layer" from the menu above the layers list.
To move a layer up or down in the list, select the layer and select "Move Up" or "Move Down" from the menu above the layers list.
Merging Layers
To combine two adjacent layers into one, select the topmost of the two layers and choose "Merge Down" from the menu above the layers list.
Blending Modes
Normally when you have multiple layers in a composition, each layer is simply painted on top of the ones below. However, you can choose from a variety of blending modes for combining layers. For example, to create a glow effect, you can set a layer to add to the colors underneath rather than replace them. To change the blending mode for a layer, select the layer, then select the chosen blending mode from the popup menu in the layers list.
 |
Normal | The top layer is painted over the bottom, taking transparency into account. |
 |
Darken | The result is the minimum level of each channel in the top and bottom layers. This has the general effect of darkening the image. |
 |
Lighten | The result is the maximum level of each channel in the top and bottom layers. This has the general effect of lightening the image. |
 |
Hue | The hue of the top is used to color the bottom layer, keeping the saturation and brightness from the bottom layer. You can use this to tint a background. |
 |
Saturation | The saturation of the top is applied to the bottom, keeping the hue and brightness from the bottom. You can use this to saturate or desaturate a background. |
 |
Brightness | The brightness of the top is applied to the bottom, keeping the hue and saturation from the bottom. You can use this to change the brightness of a background. |
 |
Color | The hue and saturation of the top are applied to the bottom, keeping the brightness from the bottom, giving a stronger effect than the Hue mode. You can use this to tint a background. |
 |
Screen | This can be thought of as the opposite of the Multiply mode. Multiply makes the image darker, Screen makes it lighter. It is the same as inverting the two images, multiplying and inverting the result. |
 |
Overlay | This is a mixture of multiply and screen which ensures that all parts of the top image are visible. |
 |
Average | The top layer is averaged with the bottom. |
| Stencil | The top layer acts like a stencil: Only the parts of the layers below which are in opaque parts of the top layer will be visible. | |
| Silhouette | The opposite of Stencil: Only the parts of the layers below which are outside opaque parts of the top layer will be visible. |
Applying a Gradient Tint
As an example of using paint modes, here's one way to apply a gradient tint to a photo. What we want to do is to apply the gradient hue to the image, keeping the original brightness of the image. This is easy to do with the Hue or Color paint modes. Simply open your image:
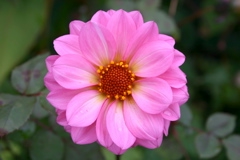
A Flower
Now create a new layer. Draw your coloured gradient into the new layer using the gradient tool. I've chosen these beautiful colors here:

Our Tint Gradient
This doesn't look very interesting - you simply have a gradient on the screen. However, you can now select the hue paint mode for the new layer which will take its hue and apply it to the layers underneath, tinting your flower image according to the gradient. If your image is in black and white to start with, this won't work because it is completely desaturated. In this case you can use the color mode which will apply saturation from the top layer.
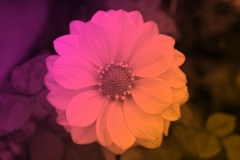
The Final Result